Thursday, December 14, 2023

Azure OpenAI Chat Web Part

This is an Azure OpenAI Chat Web Part for SharePoint Online, offering a user experience familiar to users of ChatGPT.

Data Privacy

The web part interacts with private Azure OpenAI endpoints that are published via Azure API Management service (APIM).

  • By default, this setup provides enhanced data privacy. In this configuration, requests to AI do not travel outside your Azure tenant.
  • APIM consistently validates the identities of SharePoint users for each individual request. If the request originates from authorized domains, APIM retrieves the api-key from the secure vault and injects it into the request before forwarding it to the AI endpoint. This process ensures that the api-key does not get exposed in the browser.
  • Chats are private and visible only to their creators. Creators have the option to share their chats when this feature is enabled in the web part settings (disabled by default).
  • The web part incorporates tampering prevention logic to guard against unauthorized access to another user's data by their GUID. Creators can share their chats with everyone or only with specific people in the company.

In addition to the default configuration, you have the option to publish the Native Open AI endpoint in APIM. You can find instructions in the documentation (pages 11 and 21).

  • CONS: Granting access to the Native Open AI endpoint requires a separate api-key for it and could potentially compromise data privacy, as requests might travel outside your Azure tenant under this setup.
  • PROS: Using the Native OpenAI endpoint could grant you access to the latest language models that are not currently available in Azure OpenAI.

In the simplest case, you can also use direct access to (Azure) Open AI endpoints, configured with an api-key explicitly stored in the web part properties.

  • This setup, while the least secure, can provide a quicker start. It is not recommended for production use, but it can be used for quick tests or in situations where you do not have access to Azure API Management or Azure Open AI.
  • The stored key is encrypted in the web part properties and displayed as *** in the Property Pane. However, it will travel in browser requests and can be viewed within the DEV tools > Network > Request headers.

The web part supports optional integrations with company data. For security reasons, these integrations are disabled by default and must be explicitly enabled in the web part settings.

The integrations available in this release include:

  • SharePoint Search
  • Company Users
  • Local Date and Time
  • Analysis of an uploaded PDF and summarization of its content
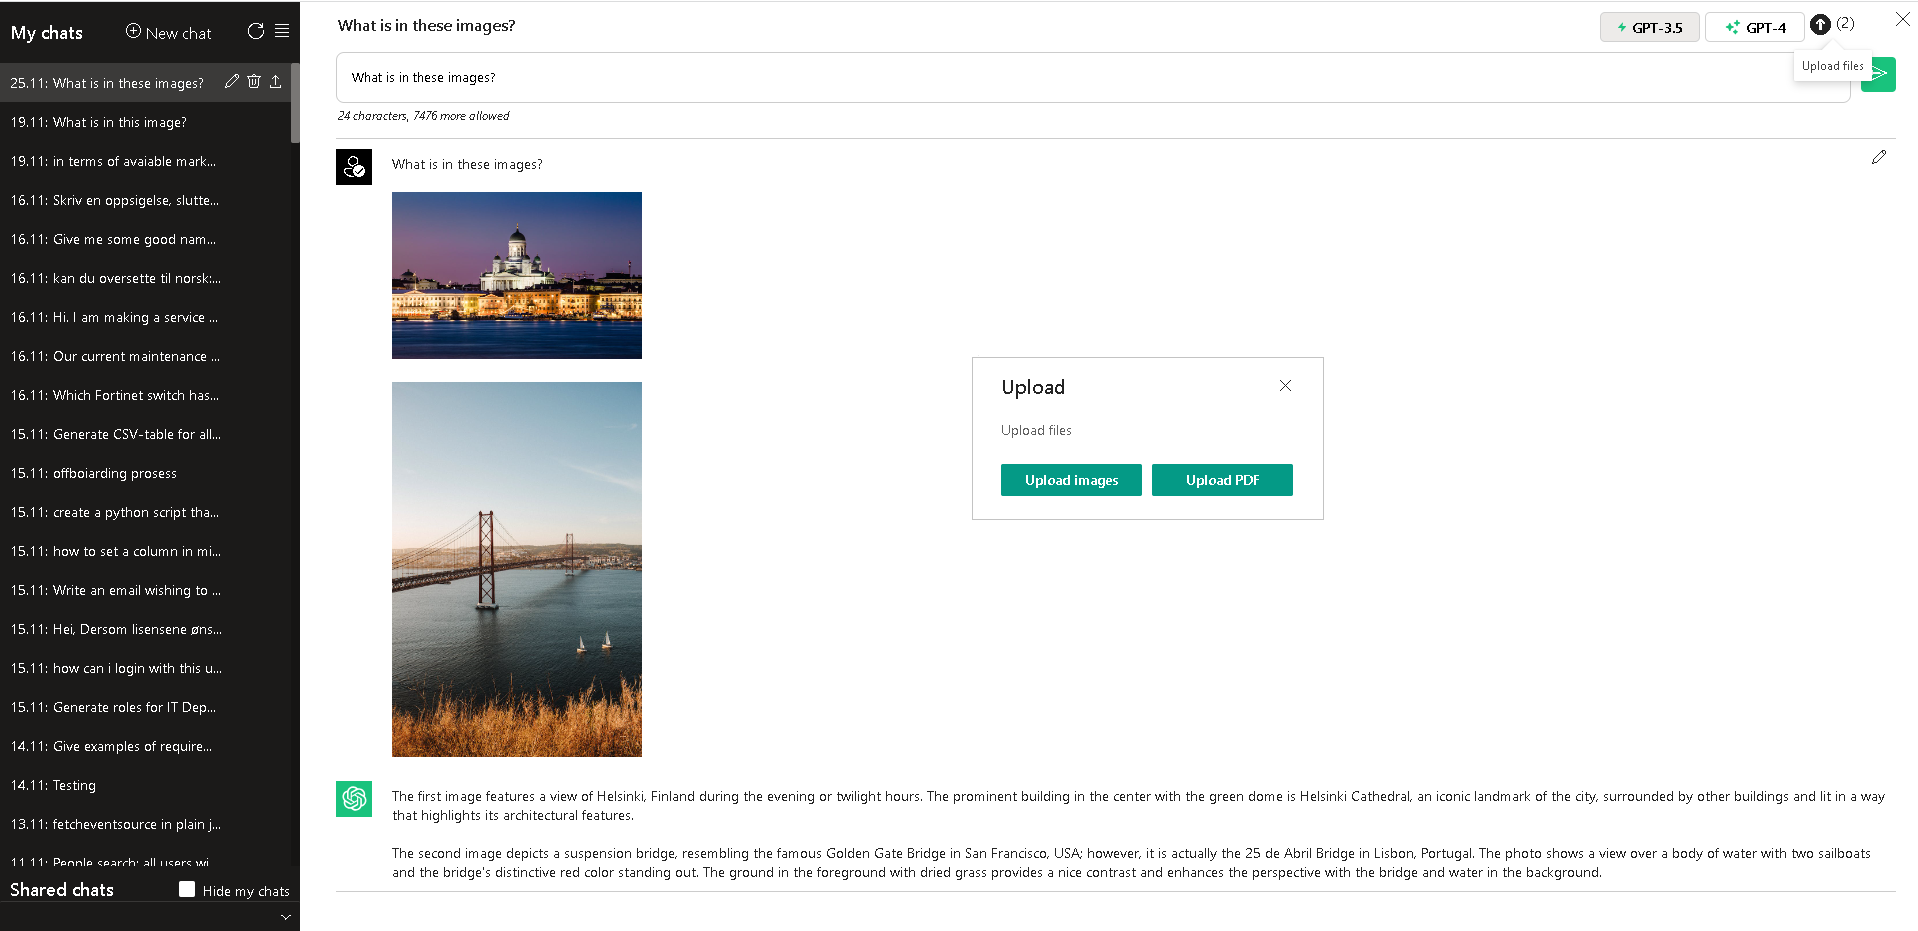
  • Analysis of uploaded images and description of their content
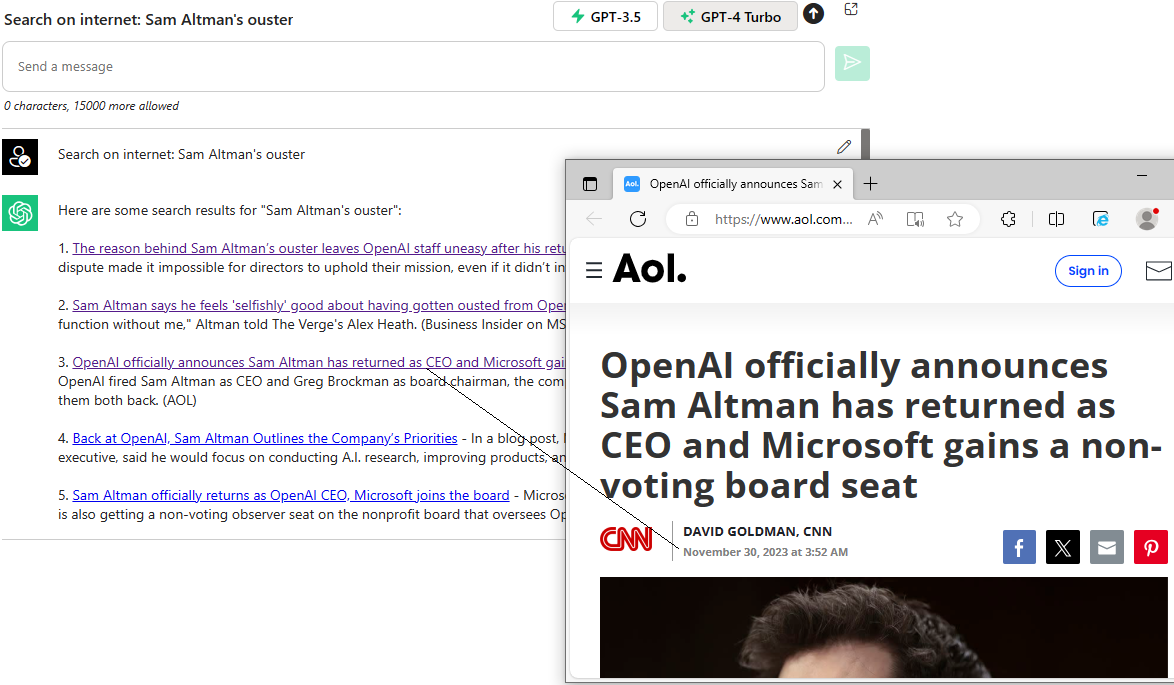
  • Version 1.1: Search on the Internet: Bing and Google (+ Reddit). Added on Dec 2, 2023.

    • The configuration is supported in two alternatives:
      1. Using the additional APIM-endpoints https://tenant.azure-api.net/bing and/or https://tenant.azure-api.net/google
      1. Using the direct Bing and Google endpoints with own api-key values stored in the web part settings (less secure).
  • Version 1.1: Image generation from the prompt text. This option supports Dalle 3. Added on Dec 5, 2023.

    • The configuration is supported in three alternatives:
      1. Using the additional APIM-endpoint https://tenant.azure-api.net/openai/dalle
      1. Using the Azure OpenAI endpoint https://tenant.openai.azure.com/openai/deployments/dalle3/images/generations?api-version=2023-12-01-preview with api-key stored in the web part settings (less secure).
      2. The model Dalle3 is available for the deployment in Swedish Central zone (as of December 2023).
      1. Using the Native OpenAI endpoint https://api.openai.com/v1/images/generations with api-key stored in the web part settings (less secure).
  • Version 1.1: The option to use voice input to prompt text is available. Added on Dec 8, 2023.

  • Beta 1.2. Dec 13, 2023: Added support for GPT-4 Vision APIM endpoint (/openai4/vision).

Full-Scale Setup
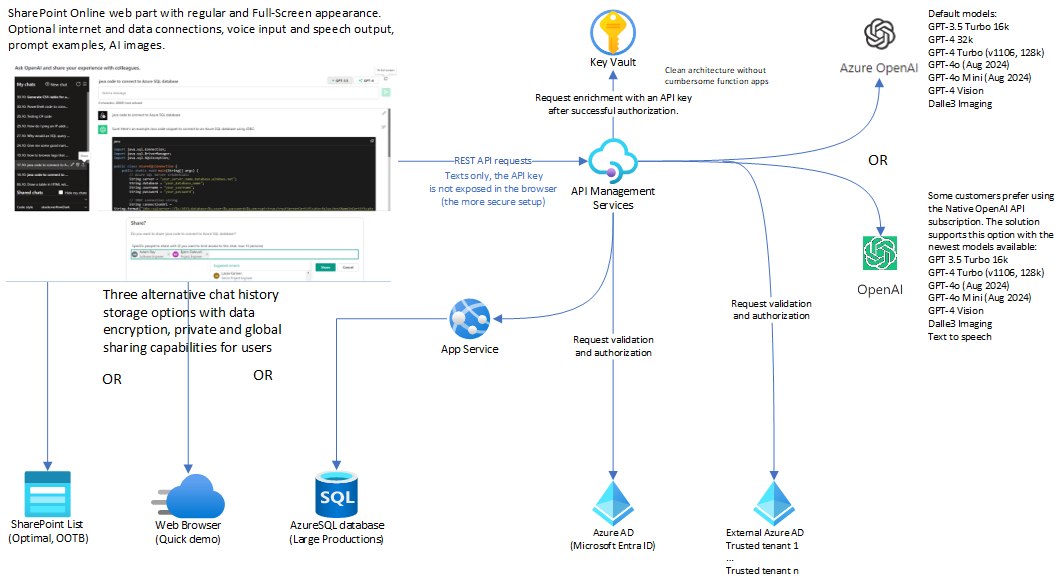
Data access diagram

Credits

I would like to express my deep respect and admiration for Microsoft, the creators of the groundbreaking Azure OpenAI service.

I am immensely grateful to Advania Finland for providing me with the opportunity and resources to develop this project.

Table of Content

User Interface
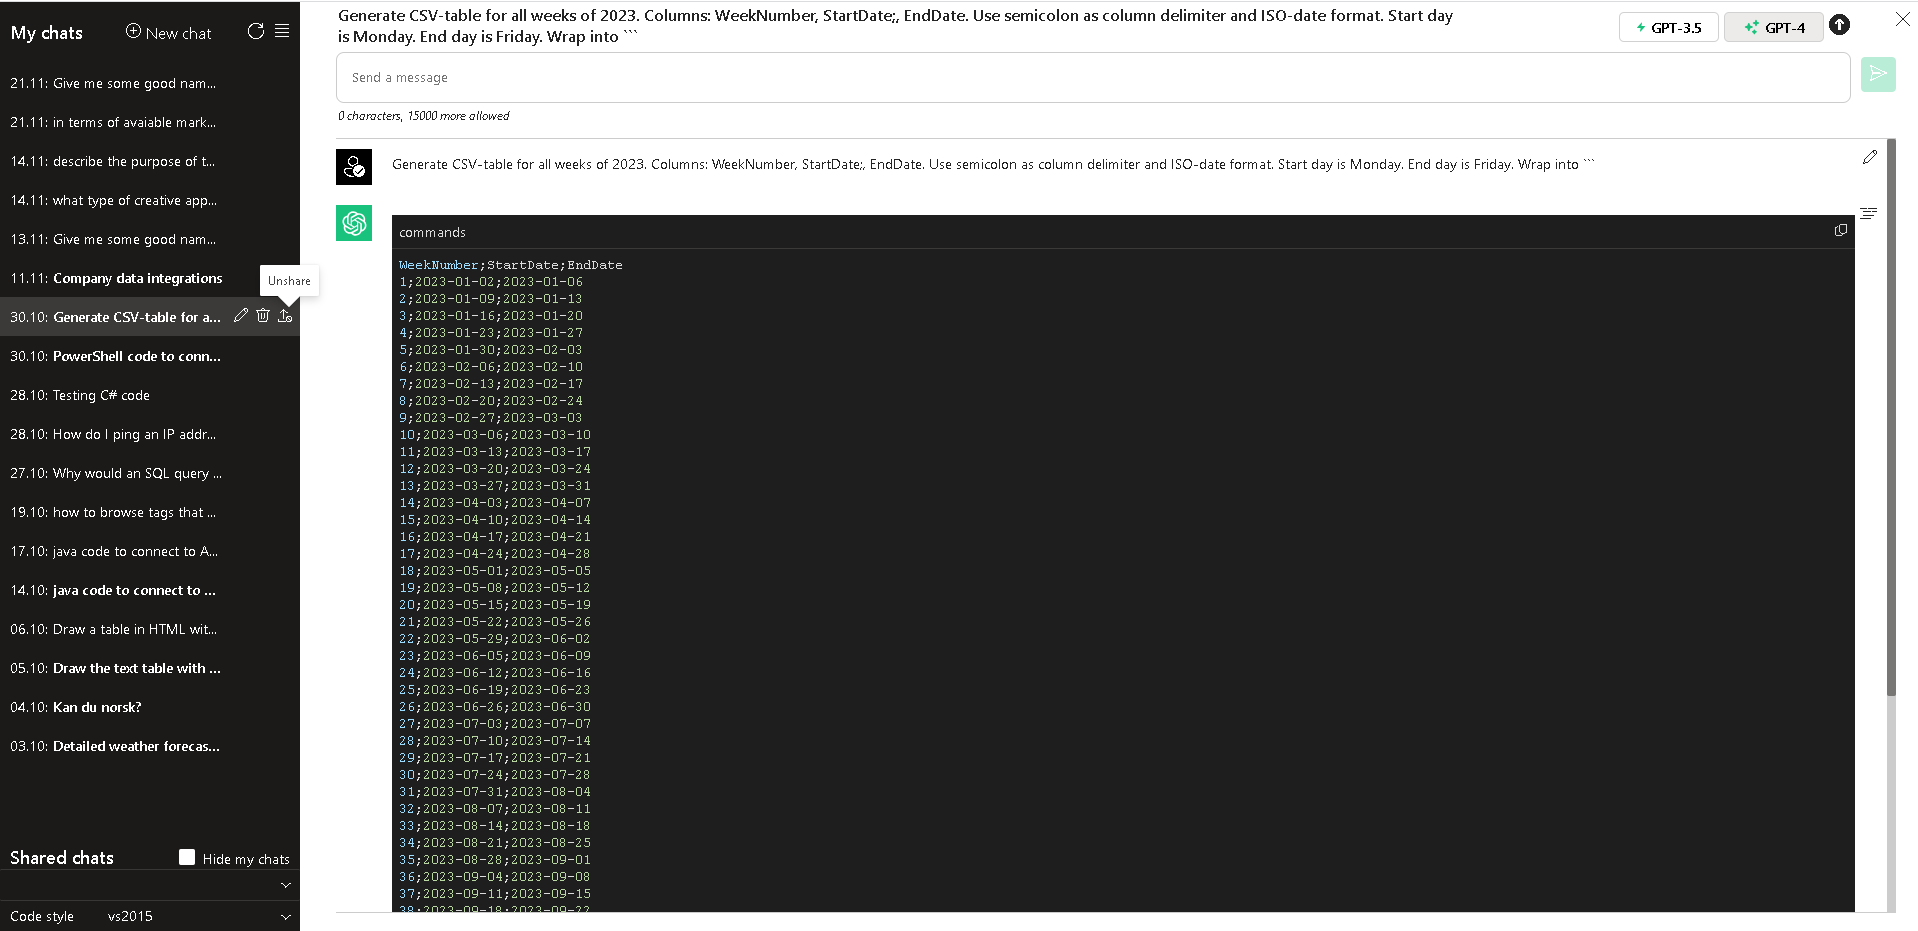
User Interface

PDF Analysis: upload a PDF and summarize its content

Image Analysis is only available with the Native OpenAI endpoint

Integration with Internet (available in Beta 1.1)

Get Started Quickly in Visual Studio Code (DEV)

This is the simplest and least secure setup. You will not be able to use the Private Chat sharing and People Search features unless you approve the corresponding SPFx permissions.

Prerequisites:

  • Visual Studio Code with a development setup for building SPFx components, versions 1.16.1 - 1.18.0.
  • You should have an api-key for Azure OpenAI instance, with configured endpoints for text models of GPT 3.5, and optionally, GPT 4.
    • Alternatively, you should have an api-key for Native OpenAI.

Configurations

  1. Clone the project.

  2. Open the project in Visual Studio Code and navigate to View > Terminal

  3. Execute the following commands

    • cd ./spfx-latest
    • npm i
    • gulp build
    • gulp serve --nobrowser
      • Alternatively, you can use fast-serve
    • npm run serve
  4. Create a Site Page in SharePoint Online and open it in "debug mode" using a format like:

    • https://yourtenant.sharepoint.com/sites/yoursite/SitePages/yourpage.aspx?debug=true&noredir=true&debugManifestsFile=https://localhost:4321/temp/manifests.js
  5. Edit the page and add the Azure OpenAI Chat web part.

  6. Open the web part settings and configure the minimal set of required properties as follows:

    • Client ID: create a user_impersonation app with name=openaiwp: keep the default "zero" value or leave it empty.

    • Base URL for GPT endpoint (APIM API or full): you can use the following alternatives:

      • Direct URL for the Azure OpenAI endpoint, configured for the deployment of GPT 3.5.

      • For example, https://instance.openai.azure.com/openai/deployments/gpt-35-turbo-16k/chat/completions?api-version=2023-07-01-preview

      • You need to have an api-key for that instance.

      • Direct URL for the Native OpenAI endpoint.

      • For example, https://api.openai.com/v1/chat/completions
      • You must have an active, paid OpenAI subscription and a valid api-key for it.
    • Base URL for GPT4 endpoint (APIM API or full): you can use the following alternatives:

      • Empty value if GPT-4 will not be used.

      • Direct URL for the Azure OpenAI endpoint, configured for the deployment of GPT 4.

      • For example, https://instance.openai.azure.com/openai/deployments/gpt-4-32k/chat/completions?api-version=2023-07-01-preview

      • Direct URL for the Native OpenAI endpoint, configured as mentioned above.

    • Base URL for Chat WebApi (APIM API or full): keep the default empty value.

    • Optional api-key for Azure OpenAI (for troubleshooting, not for Production): add your api-key

      • The key for Azure OpenAI or Native OpenAI, depending on your choices above.

      • It will be encrypted and stored in the web part settings (and displayed as *** in the Property Pane).

    • Language Models: If you have different models, adjust default values in the text box accordingly.

    • Storage type for chat history: keep the default SharePoint list or select Local storage for a quick review.

    • SharePoint list URL (leave it empty for default URL): leave it empty and click the Create button if you opt to use SharePoint list storage.

      • This will create a custom list, dbChats, in the current site collection.

      • By default, the chat sharing option is disabled.

      • If you enable it using the corresponding checkbox below the field, click on the Update button to adjust the list's permissions.
      • The used list template can be found in the package.

      • Note, if you use Local storage you will be able to review sharing features. However, real sharing between users will not work with Local storage because chat history is stored locally. The maximum capacity of Local storage is limited to 10 Mb.

  7. Save web part settings. Reload the page.

  8. Test the setup by adding any text into the prompt text area, then pressing Enter or clicking the Submit button.

    • The AI-response should appear in the content area below.
    • Try the same steps with another language model (GPT-4).
    • Click on the upward arrow in the right-hand corner. Select any PDF file - for instance, from ./docs folder - and click OK to upload it. Click on the Submit button to summarize the uploaded PDF.

Get Started Quickly with a prebuilt web part package

This is the simplest and least secure standalone setup. You will not be able to use the Private Chat sharing and People Search features unless you approve the corresponding SPFx permissions.

Prerequisites:

  • You should be a site collection administrator or hold the role of SharePoint Administrator to create a new site.
  • You should have an api-key for Azure OpenAI instance, with configured endpoints for text models of GPT 3.5, and optionally, GPT 4.
    • Alternatively, you should have an api-key for Native OpenAI.

Configurations

  1. Download the latest release package or compile it from the source code in spfx-latest.

  2. Create a site collection in SharePoint Online and an App Catalog for it.

    • PnP.PowerShell: Add-PnPSiteCollectionAppCatalog
    • Alternatively, to simplify the process, just deploy the package into the global App Catalog of your tenant.
  3. Upload the package into the App Catalog.

    • Add the app Azure OpenAI Chat Web Part to the site. Please ignore the warning about the required access permissions.
  4. Add a new Site Page and the web part Azure OpenAI Chat to it.

  5. Open the web part settings and configure the minimal set of required properties as follows:

    • Client ID: create a user_impersonation app with name=openaiwp: keep the default "zero" value or leave it empty.

    • Base URL for GPT endpoint (APIM API or full): you can use the following alternatives:

      • Direct URL for the Azure OpenAI endpoint, configured for the deployment of GPT 3.5.

      • For example, https://instance.openai.azure.com/openai/deployments/gpt-35-turbo-16k/chat/completions?api-version=2023-07-01-preview

      • You need to have an api-key for that instance.

      • Direct URL for the Native OpenAI endpoint.

      • For example, https://api.openai.com/v1/chat/completions
      • You must have an active, paid OpenAI subscription and a valid api-key for it.
    • Base URL for GPT4 endpoint (APIM API or full): you can use the following alternatives:

      • Empty value if GPT-4 will not be used.

      • Direct URL for the Azure OpenAI endpoint, configured for the deployment of GPT 4.

      • For example, https://instance.openai.azure.com/openai/deployments/gpt-4-32k/chat/completions?api-version=2023-07-01-preview

      • Direct URL for the Native OpenAI endpoint, configured as mentioned above.

    • Base URL for Chat WebApi (APIM API or full): keep the default empty value.

    • Optional api-key for Azure OpenAI (for troubleshooting, not for Production): add your api-key

      • The key for Azure OpenAI or Native OpenAI, depending on your choices above.

      • It will be encrypted and stored in the web part settings (and displayed as *** in the Property Pane).

    • Language Models: If you have different models, adjust default values in the text box accordingly.

    • Storage type for chat history: keep the default SharePoint list or select Local storage for a quick review.

    • SharePoint list URL (leave it empty for default URL): leave it empty and click the Create button if you opt to use SharePoint list storage.

      • This will create a custom list, dbChats, in the current site collection.

      • By default, the chat sharing option is disabled.

      • If you enable it using the corresponding checkbox below the field, click on the Update button to adjust the list's permissions.
      • The used list template can be found in the package.

      • Note, if you use Local storage you will be able to review sharing features. However, real sharing between users will not work with Local storage because chat history is stored locally. The maximum capacity of Local storage is limited to 10 Mb.

  6. Save web part settings. Reload the page.

  7. Test the setup by adding any text into the prompt text area, then pressing Enter or clicking the Submit button.

    • The AI-response should appear in the content area below.
    • Try the same steps with another language model (GPT-4).
    • Click on the upward arrow in the right-hand corner. Select any PDF file - for instance, from ./docs folder - and click OK to upload it. Click on the Submit button to summarize the uploaded PDF.

More Advanced Setup

Prerequisites:

  • You should be:

    • In the role of Entra Application Administrator (Application Developer) or Global Administrator to create App registrations and approve permissions.
    • A site collection administrator or hold the role of SharePoint Administrator to create a new site.
  • You should create an instance of Azure OpenAI and configure deployments for GPT 3.5, and optionally, GPT 4 text language models.

    • Alternatively, if you do not have access to Azure OpenAI, you can use the Native OpenAI endpoint.
  • Optionally, you can deploy the API Management service and publish (Azure) OpenAI endpoints there.

    • You should have an api-key for Azure OpenAI instance, with configured endpoints for GPT 3.5 and, optionally, GPT 4 text language models.
    • Alternatively, you should have an api-key for Native OpenAI.
    • For detailed instructions on configuring Azure OpenAI and APIM endpoints, please refer to the project documentation in azure-openai-chat-web-part.pdf (pages 17-38).

Configurations

  1. Download the latest release package or compile it from the source code in spfx-latest.

  2. Create a site collection in SharePoint Online and an App Catalog for it.

  3. Upload the package into the App Catalog.

    • Add the app Azure OpenAI Chat Web Part to the site. Please note the warning about the required access permissions.
  4. Create a new App registration called openaiwp in Microsoft Entra ID (Azure AD) using default settings.

    • This step can be skipped if you do not plan to use the API Management service to secure access to (Azure) OpenAI endpoints.

    • The app will be used to verify users in APIM. openaiwp is the default name used in web part permissions.

    • Save the App ID (Client ID). You will use it in the web part settings.

5. Review and approve access permissions for the uploaded SPFx package in the API access section of your SharePoint Online tenant.

  • This step can be skipped if you do not plan to use the API Management service to secure access to (Azure) OpenAI endpoints.

  • openaiwp > Azure OpenAI Chat Web Part > user_impersonation: required to verify users in APIM.

  • Microsoft Graph > People.Read and Microsoft Graph > User.Read.All: permissions needed to retrieve colleagues and other users from Azure AD.

    • These permissions are necessary only if you plan to use the features of private chat sharing and people search in the web part (limited to specific Azure AD accounts).
  • Add a new Site Page and the web part Azure OpenAI Chat to it.

  • Open the web part settings and configure the minimal set of required properties as follows:

    • Client ID: create a user_impersonation app with name=openaiwp: use the saved App ID, refer to point 4 above.

      • If you do not use APIM, keep the default "zero" value or empty it.
    • Base URL for GPT endpoint (APIM API or full): You have the following alternative options:

      • Preconfigured APIM URL for GPT 3.5: https://yourapiminstance.azure-api.net/openai

      • Direct URL for Azure OpenAI endpoint configured for GPT 3.5 deployment.

      • For example, https://instance.openai.azure.com/openai/deployments/gpt-35-turbo-16k/chat/completions?api-version=2023-07-01-preview

      • You need to have an api-key for that instance.

      • Direct URL for the native OpenAI endpoint.

      • For example, https://api.openai.com/v1/chat/completions

      • You need to have an active, paid OpenAI subscription and a valid api-key for it.

    • Base URL for GPT4 endpoint (APIM API or full): You have the following alternative options:

      • No value, implying GPT-4 will not be used.

      • Preconfigured APIM URL for GPT 3.5: https://yourapiminstance.azure-api.net/openai4

      • Direct URL for Azure OpenAI endpoint configured for GPT 4 deployment. Same as above.

      • For example, https://instance.openai.azure.com/openai/deployments/gpt-4-32k/chat/completions?api-version=2023-07-01-preview

      • Direct URL for the native OpenAI endpoint. Same as above.

      • For example, https://api.openai.com/v1/chat/completions

    • Base URL for Chat WebApi (APIM API or full): leave it empty.

      • It's not in use for the default SharePoint list storage.

      • If left empty, it defaults to https://yourapiminstance.azure-api.net/chatwebapi when Database storage is used.

    • Optional api-key for Azure OpenAI (for troubleshooting, not for Production): add your api-key if you don't use APIM.

      • The key is for Azure OpenAI or Native OpenAI, depending on your choices above.

      • It will be encrypted and stored in the web part settings (and displayed as *** in the Property Pane).

    • Language models: adjust values in the text box if you have different ones.

    • Storage type for chat history: keep the default SharePoint list.

    • SharePoint list URL (leave it empty for the default URL): leave it empty and click on the Create button.

      • It will create a custom list called dbChats in the current site collection.

      • By default, the chat sharing option is disabled.

      • The used list template can be found in the package.

      • If you enable it using the corresponding checkbox below the field, click on the Update button to adjust the list's permissions.

  • Save web part settings. Reload the page.

  • Test the setup by adding any text into the prompt text area, then pressing Enter or clicking the Submit button.

    • The AI-response should appear in the content area below.
    • Try the same steps with another language model (GPT-4).
    • Click on the upward arrow in the right-hand corner. Select any PDF file - for instance, from ./docs folder - and click OK to upload it. Click on the Submit button to summarize the uploaded PDF.

Full-Scale Setup for Large Environments

Prerequisites:

  • You should hold the role of an Entra Global Administrator.
  • You should have the ability to create and configure Azure OpenAI service, API Management service, App Service, Azure SQL database, App registrations and permissions, as well as SharePoint Online site collections.

Configurations

Please refer to the project documentation in azure-openai-chat-web-part.pdf and azure-openai-chat-security.pdf

Notes on npm install and associated warnings

The reference: Don't be alarmed by vulnerabilities after running NPM Install

When working with SPFx solutions, it is important to note that npm packages are not deployed to SharePoint. Therefore, any audit warnings related to these packages can be disregarded in the context of SPFx solutions.

Auxiliary modules

In addition to the standard set of modules employed by SPFx 1.18 with React base, the project includes references to the following additional libraries:

  • @fluentui/react: Provided by Microsoft for building a richer UI experience.
  • @microsoft/fetch-event-source: Used to implement Consecutive Event Streaming. It is used only when the web part setting Event streaming is enabled (default).
  • crypto-js, @types/crypto-js: These are used to encrypt and decrypt an api-key when the user explicitly adds it to web part settings. This is not required in the default APIM-based setup.
  • react-pdf: Used to extract text from uploaded PDFs. It is used only when the web part setting Enable integrations is enabled (disabled by default).
  • react-syntax-highlighter: Adds code highlighting capabilities. It is used only when the web part setting Code highlighting is enabled (default).
  • react-speech-recognition: the library uses Web Speech API and provides the capabilities for the Voice input feature.
  • prettier, fast-serve: These development tools are used exclusively in the development environment.

Thursday, October 25, 2018

SharePoint Online: How to add unrestricted access to a dedicated site collection for external people and prevent them from accessing other sites


I had an interesting case related to granting unrestricted access to a specific site collection for external specialists while restricting them from accessing any other sites in our SharePoint Online instance.

Case


We had deployed a Financial SharePoint App from one of the software vendors into a new site collection. Some time later, Head of our IT department asked me to grant unrestricted access for maintenance specialists of that vendor only to this site collection and ensure they cannot access anything else to comply with GDPR enforcement.

After a short discussion on available options, we discovered a couple of issues there
  • As you probably know, adding external accounts to site Owners group does not provide absolutely unrestricted access to system areas of this site. The account must be added namely to Site Collection Administrators.
  • Creating temporary regular “internal” O365 accounts was not an option as they would immediately become members of the virtual group “Everyone except external users”. In our case, this group had Read permissions configured in many other site collections including HR data for the employees, IT Service Desk, etc. There’s no way to remove an internal O365 account from “Everyone except external users”.


Established solution


Steps below assume you are a Global Administrator in your O365 Tenant.

1. Create a dummy Gmail or Outlook Online account then create a new Microsoft Account based on it.
  • For example, vendorname@gmail.com
  • You can register a new Microsoft Account in O365 sign-in window; there’s a link to do it.

2. Configure O365 Tenant-wide external sharing
  • https://portal.office.com/adminportal/home#/homepage > Search for “Sites external sharing” > Adjust settings if necessary.

3. Configure external sharing in your target Site Collection to allow New and existing external users.
  • https://portal.office.com/adminportal/home#/homepage > Search for “Manage sites” > Find your site collection > Adjust Sharing status to “New and existing external users (sign-in required)” and save changes. 
  • Make sure changes have been actually applied (it may take some time).

4. SharePoint Online does not support adding new external accounts directly to Site Collection Administrators. However, there’s a simple workaround. Open your site collection and add the Microsoft Account from p.1 to any SharePoint group of your site, for example, to site Visitors.
  • You can find it under https://<your site collection>/_layouts/15/user.aspx
  • If you are unable to add the external user to the group, check the settings of external sharing (see p.2 and 3 above).

5. After that, you will be able to add your Microsoft Account to Site Collection Administrators.
  • Use https://<your site collection> /_layouts/15/mngsiteadmin.aspx
  • After that, remember to remove this account from a site group to which you added it in p.4.

6. Adjust external sharing settings for your site collection to support Only existing external users.
  • https://portal.office.com/adminportal/home#/homepage > Search for “Manage sites” > Find your site collection > Adjust Sharing status to “Only existing external users (sign-in required)” and save changes. 
  • Make sure changes have been actually applied (it may take some time).
  • This sharing level provides correct functioning of external site collection administrators but prevents them from attempts to share the site collection with other externals.

7. Now try to sign-in using the Microsoft Account from p.1. This account should have unrestricted control over the target site collection while access to any other sites will be denied.


Known issues


Term Store does not seem to have any options to restrict Read access for external users. In our case, it did not have confidential data.

Monday, February 5, 2018

Alter Modern UI of SharePoint Online pages using just a conventional JavaScript

In one of my recent projects, I have discovered a relatively quick and simple way to extend Modern UI of SharePoint pages without deploying any tailor-made SPFx-component.

As you probably know, Microsoft has prohibited execution of conventional JS-code in Modern pages of SharePoint Online / 2019 "on-prem".

There is an official option to enable running JS-code in Modern SharePoint sites - by turning off NoScript feature - but it only permits running JS-code in classic pages.

It's pity but Modern UI pages of SharePoint do not support execution of conventional JavaScript by design, even with NoScript feature disabled.

To address this problem, Microsoft usually suggests coding relatively time-consuming SPFx components. And, of course, you need to study how to code them. In many cases, it simply does not worth to mess with SPFx parts for the sake of making a tiny dynamic change or correction in Modern UI. For example, to inject a short informational block at the end of the current navigation in O365 Group.

However, I have found an interesting undocumented breach in Modern UI of SharePoint, which permits direct injection and execution of conventional JavaScript in modern pages.

Shortly about the technique


1. Create a classic page in some classic site of SharePoint, which permits execution of JavaScripts in it. This site can have different URL but it should be in the same tenant.
- For example, /siteassets/modern/pages/classic.aspx. Hint: you can use /_layouts/15/spcf.aspx to add a new web-part page to a desired library and then move it to another folder.

2. Add a standard Embed Client Web Part to a Modern page of SharePoint, which you want to extend with conventional JavaScript.

3. Configure Embed-part to load the classic page from p.1. Embed-part is rendered a regular IFrame by default.

4. Add a custom JS-code file to a SharePoint library
- For example, to be available as /siteassets/modern/js/custom-modern-ui.js

5. Add this JS-code to the classic page. This code will inject itself and any additional JS-scripts into its parent Modern page via IFrame. And the injected code can do any changes on the Modern page!

It's technically possible to do because the parent page with IFrame and the classic page loaded into the IFrame's body have the identical origin in the same tenant.

Using the described technique, it becomes easy to utilize, for example, classic SharePoint modal dialogs in Modern UI pages of O365 Groups (see the screenshots). I know that many of my fellow developers and users would still want to have them in Modern UI.

What's important, this technique works independently on NoScript feature. It does not matter if it's turned on or off.

People, company, and event names shown in the screenshots below are fictitious. Any similarities to real ones are merely coincidental.


Sample JavaScript injector


  1
  2
  3
  4
  5
  6
  7
  8
  9
 10
 11
 12
 13
 14
 15
 16
 17
 18
 19
 20
 21
 22
 23
 24
 25
 26
 27
 28
 29
 30
 31
 32
 33
 34
 35
 36
 37
 38
 39
 40
 41
 42
 43
 44
 45
 46
 47
 48
 49
 50
 51
 52
 53
 54
 55
 56
 57
 58
 59
 60
 61
 62
 63
 64
 65
 66
 67
 68
 69
 70
 71
 72
 73
 74
 75
 76
 77
 78
 79
 80
 81
 82
 83
 84
 85
 86
 87
 88
 89
 90
 91
 92
 93
 94
 95
 96
 97
 98
 99
100
101
102
103
104
105
106
107
108
109
110
111
112
113
114
115
116
117
118
119
120
121
122
123
124
125
126
127
128
129
130
131
132
133
134
135
136
137
138
139
140
141
142
143
144
145
146
147
148
149
150
151
152
153
154
155
156
157
158
159
160
161
162
163
164
165
166
167
168
169
170
171
172
173
174
175
176
177
178
179
180
181
182
183
184
185
186
187
188
189
190
191
192
193
194
195
196
197
198
199
200
201
202
203
204
205
206
207
208
209
210
211
212
213
214
215
216
217
218
219
220
221
222
223
224
225
226
227
(function () {
  // --------------------------------------------------------------------------------------------------------
  // SharePoint Online conventional JavaScript extender for Modern UI pages.
  // --------------------------------------------------------------------------------------------------------
  // Copyright: Paul Borisov, 2018. You can use the code below "as is" or modified without any limitations.
  // Should you find this module useful in your projects/tasks please keep this copyright header intact.
  // --------------------------------------------------------------------------------------------------------
  // Usage:
  // Put this code to some place in your SharePoint Online Tenant. 
  // For example, make it simple and put it to /siteassets/modern/js/custom-modern-ui.js
  // - Note/change the reference at line 56: /siteassets/modern/js/custom-modern-ui.js
  // Add a reference to the JS-file into a classic page of a classic SharePoint site situated in the same
  // SharePoint Online tenant (i.e. it should have the same origin as your Modern UI page).
  // For example, /siteassets/modern/pages/classic.aspx
  // - Note/change references at lines 202 and 212:
  // iframe[src*='\/classic\.aspx'], /siteassets/modern/pages/classic.aspx
  // Note you can also use a modern SharePoint site with disabled NoScript feature. 
  // After that, edit your Modern UI page, add OOB Embed-part, and configure its IFrame source 
  // to point to your classic page (see above). Save changes, publish the page, and reload it.
  // Expected results: the code should inject itself in a Modern UI page, and extend its current navigation
  // with a tiny informational block. This block will contain a button.
  // Click on this button should open a classic SharePoint dialog being in the context of Modern UI.
  // - Correct its URL at line 194.
  // --------------------------------------------------------------------------------------------------------
  // Author: Paul Borisov, http://paulborisov.blogspot.fi/2018/02/a-fancy-option-to-alter-modern-ui-of.html
  // --------------------------------------------------------------------------------------------------------
  var _MaxLoadAttempts = 50;
  var _CurrentLoadAttempt = 0;
  
  var _EditGroupInfo = 
  '<div class="pb-edit-button">' +
    '<input type="button" value="Edit" />' +
  '</div>';

  var _MessageGroupInfoNotFound = 
  '<div class="pb-container">' +
    '<div class="pb-start-of-table">Group Information</div>' +
    '<div class="pb-noresults ms-cellstyle ms-vb2">There is no data to show.</div>' +
  '</div>';

  var _Css = 
    '<style type="text/css">' + 
    ' .pb-container {}' +
    ' .pb-start-of-table {font-weight:bold;font-size:16px;display:block !important;margin-left:18px;}' +
    ' .pb-noresults {margin-left:14px;}' +
    ' .pb-edit-button {}' +
    ' .pb-edit-button input {width:85%;margin-left:19px;margin-bottom:10px;}' +
    ' .ms-Nav {overflow:hidden;}' +
    ' .sp-livePersonaCardAdapter-root {background-color:transparent !important;}' +
    ' .sp-livePersonaCardAdapter-root canvas {width:32px;}' +
    ' div[class*="spAvatar"] {margin-right:15px;}' +
    '</style>';
  
  var _SiteResources = [
    "//cdnjs.cloudflare.com/ajax/libs/jquery/3.3.1/jquery.min.js"
    ,"/siteassets/modern/js/custom-modern-ui.js"
  ];
  var _ResourcesToSupportModalDialogInModernPages = [
    "/_layouts/15/init.js"
    ,"/_layouts/15/sp.init.js"
    ,"/_layouts/15/1033/initstrings.js"
    ,"/_layouts/15/1033/sp.res.js"
    ,"/_layouts/15/msajaxbundle.js"
    ,"/_layouts/15/sp.ui.dialog.js"
    ,"/_layouts/15/core.js"
    ,"/_layouts/15/1033/styles/corev15.css"

    // There is a bug in MS loaders: sometimes initialization fails and requires a repeatable load.
    // In a repeatable load the same initialization always succeeded.
    ,"/_layouts/15/init.js"
    ,"/_layouts/15/sp.init.js"
    ,"/_layouts/15/1033/initstrings.js"
    ,"/_layouts/15/1033/sp.res.js"
    ,"/_layouts/15/msajaxbundle.js"
    ,"/_layouts/15/sp.ui.dialog.js"
    ,"/_layouts/15/core.js"
    ,"/_layouts/15/1033/styles/corev15.css"
  ];
  var _ResourcesToSupportModalDialogInModernPagesLoaded = false;
  var _SiteResourcesLoaded = false;
  var _IFrameContext = false;

  function LoadSingleResourceFile( fileUrl, force ) {
    if( fileUrl == null ) return;

    var el = null;
    if( fileUrl.match(/\.css/i) ) {
      var alreadyLoaded = document.querySelector("link[href*='" + fileUrl + "']") != null;
      if( !alreadyLoaded || force ) {
        el = document.createElement("link");
        el.rel = "stylesheet";
        el.type = "text/css";
        el.href = fileUrl;
      }
    } else if( fileUrl.match(/\.js/i) ) {
      var alreadyLoaded = document.querySelector("script[src*='" + fileUrl + "']") != null;
      if( !alreadyLoaded || force ) {
        el = document.createElement("script");
        el.type = "text/javascript";
        el.src = fileUrl;
      }
    }
    if( el ) {
      window.parent.document.getElementsByTagName("head")[0].appendChild(el);
      console.log(fileUrl + " loaded in " + window.parent.location.href);
    }
  }

  function LoadSingleResourceFile2( fileUrl, force ) {
    if( fileUrl == null ) return;

    var el = null;
    if( fileUrl.match(/\.css/i) ) {
      var alreadyLoaded = document.querySelector("link[href*='" + fileUrl + "']") != null;
      if( !alreadyLoaded || force ) {
        el = document.createElement("link");
        el.rel = "stylesheet";
        el.type = "text/css";
        el.href = fileUrl;
      }
    } else if( fileUrl.match(/\.js/i) ) {
      var alreadyLoaded = document.querySelector("script[src*='" + fileUrl + "']") != null;
      if( !alreadyLoaded || force ) {
        el = document.createElement("script");
        el.type = "text/javascript";
        el.src = fileUrl;
      }
    }
    if( el ) {
      jQuery("head").append(jQuery(el));
      console.log(fileUrl + " loaded in " + window.parent.location.href);
    }
  }
  
  function LoadResources(urlArray) {
    if( urlArray == null ) return;
    
    for( var key in urlArray ) {
      var fileUrl = urlArray[key];
      try {
        LoadSingleResourceFile2(fileUrl, true);
      } catch(e) {
        console.log("ERROR loading " + fileUrl + ": " + e.message);
      }
    }
  }

  function LoadSiteResources() {
    if( !_SiteResourcesLoaded ) {
      for( var key in _SiteResources ) {
        var fileUrl = _SiteResources[key];
        try {
          LoadSingleResourceFile(fileUrl, true);
        } catch(e) {
          console.log("ERROR loading " + fileUrl + ": " + e.message);
        }
      }
    }
    _SiteResourcesLoaded = true;
  }

  function LoadDynamicContent() {
    _CurrentLoadAttempt++;
    if( typeof jQuery == "undefined" ) {
      if( _CurrentLoadAttempt <= _MaxLoadAttempts) {
        setTimeout(LoadDynamicContent,100);
        return;
      } else {
        console.log("jQuery was not loaded in " + (_CurrentLoadAttempt-1) + " attempts. Processing stopped.");
        return;
      }
    }
    
    jQuery(document).ready(function(){
      if( _IFrameContext ) {
        // Inject the main resources on execution inside the IFrame
        // Note it also injects this JS-file a new instance of which is then executed in the main window (parent of iframe).
        LoadSiteResources();
      } else {
        if( document.querySelector(".pb-container") ) return;
        // Inject custom CSS.
        jQuery("head").append(jQuery(_Css));
        // Inject the additional resources like prerequisites for SP modal dialog on execution inside the main parent window.
        if( !_ResourcesToSupportModalDialogInModernPagesLoaded ) {
          LoadResources(_ResourcesToSupportModalDialogInModernPages);
        }
        _ResourcesToSupportModalDialogInModernPagesLoaded = true;

        var edit = jQuery(_EditGroupInfo);
        edit.on("click", function() {
          SP.SOD.executeFunc('sp.ui.dialog.js', 'SP.UI.ModalDialog',
            function(){
              var _options = {
                url:'http://paulborisov.blogspot.fi/2018/02/a-fancy-option-to-alter-modern-ui-of.html'
              };
              SP.UI.ModalDialog.showModalDialog(_options);
            }
          )
        });
        jQuery("#sideNavBox,nav.ms-Nav").append(edit);
        jQuery("#sideNavBox,nav.ms-Nav").append(jQuery(_MessageGroupInfoNotFound));
        var iframe = document.querySelector("iframe[src*='\/classic\.aspx']");
        if( iframe != null ) {
          jQuery(iframe).parents(".ControlZone:first").detach();
        }
      }
    });
  }
  
  //if( document.location.href.match(/GroupSummary\.aspx/i) ) {
  if( document.location.href.toLowerCase() != window.parent.document.location.href.toLowerCase() ) {
    // This part is executed when the page /siteassets/modern/pages/classic.aspx
    // is loaded inside the iframe hosted in a modern site's page.
    // After that, it injects necessary scripts including jQuery, this script, and some custom.css.
    // from the folder /siteassets/modern into the same modern site's page, which contains the iframe.
    _IFrameContext = true;
    LoadDynamicContent();
  } else {
    // This part is executed after the file was injected into the modern site's page.
    // For example, into https://customer.sharepoint.com/sites/SomeO365group/SitePages/Home.aspx
    if( document.location.href.match(/Mode=Edit/i) == null ) {
      // If the page is not in edit mode
      _IFrameContext = false;
      LoadDynamicContent();
    }
  }
})();

Sunday, January 22, 2017

How to enlists AD user group memberships recursively including all parent groups and using standard capabilities of Active Directory module for Windows Powershell

Recently, one of my customers has asked me to write a simple solution, which would assist him with recursive retrieval of group memberships of every AD and local built-in groups in his domain and local machine.

Thus the solution should have listed every group to which his account directly belonged to as well as all parent groups chained to it. In addition, the solution should have retrieved and show the owner of each group.

Typical use cases

Use case 1. Put user1 is a direct member of group1. group1 is a direct member of group 2, group2 is a direct member of group3. So the full chain reads as user1 > group1 > group2 > group3. The logic should return group1, group2, group3 for user1.

Use case 2. Put user1 is a direct member of group1. group1 is a direct member of group 2. group2 also includes group3 as a member, however, group3 does not contain user1. So the full chain reads as user1 > group1 > group2. And group 3 > group 2. In this case, the logic should return only group1 and group2 for user1.

Powershell-based solution

The complete source code of the solution is given below.

The solution runs in Powershell version 2.0 or higher. It employs the standard cmdlets of Powershell module "ActiveDirectory" for Windows. Details on a quick installation of this module to various editions of Windows will be given in the next chapter.


  1
  2
  3
  4
  5
  6
  7
  8
  9
 10
 11
 12
 13
 14
 15
 16
 17
 18
 19
 20
 21
 22
 23
 24
 25
 26
 27
 28
 29
 30
 31
 32
 33
 34
 35
 36
 37
 38
 39
 40
 41
 42
 43
 44
 45
 46
 47
 48
 49
 50
 51
 52
 53
 54
 55
 56
 57
 58
 59
 60
 61
 62
 63
 64
 65
 66
 67
 68
 69
 70
 71
 72
 73
 74
 75
 76
 77
 78
 79
 80
 81
 82
 83
 84
 85
 86
 87
 88
 89
 90
 91
 92
 93
 94
 95
 96
 97
 98
 99
100
101
102
103
104
105
106
107
108
109
110
111
112
113
114
115
116
117
118
119
120
121
122
123
124
125
126
127
128
129
130
131
132
133
134
135
136
137
138
139
140
141
142
143
144
145
146
147
148
149
150
151
152
153
154
155
156
157
158
159
160
161
162
param(
  [string]$userName = [System.Environment]::UserName    # Valid formats: ID, domain\ID, ID@domain, ID@domain.com
  ,[bool]$useExtendedOutput = $false
)

######################################################## FUNCTIONS #########################################################
function Get-ADGroupRecursiveParentChain() {
param(
  [string]$distinguishedName                # Sample value: CN=TestGroupGlobal,CN=Users,DC=vanilla,DC=cgi,DC=com
  ,[array]$allGroups
)
  $group = Get-ADGroup -Identity $distinguishedName -Property MemberOf,ManagedBy
  if( !$? ) {
    throw
  }
  $tmp = ($allGroups |? {$_.distinguishedName -ieq $group.distinguishedName})
  if( $tmp -eq $null -or $tmp.Length -eq 0 ) {
    $allGroups += $group
  }
  $group.MemberOf | % {
    $nestedGroup = Get-ADGroup -Identity $_ -Property MemberOf,ManagedBy
    if( !$? ) {
      throw
    } 
    $tmp2 = ($allGroups |? {$_.distinguishedName -ieq $nestedGroup.distinguishedName})
    if( $tmp2 -eq $null -or $tmp2.Length -eq 0 ) {
      $allGroups += $nestedGroup
    }
    $allGroups = Get-ADGroupRecursiveParentChain -distinguishedName $nestedGroup.distinguishedName -allGroups $allGroups
  }
  
  return $allGroups
}
####################################################### //FUNCTIONS ########################################################

####################################################### EXECUTION ##########################################################
# Step 0. Perform validations to confirm the standard Windows Active Directory Powershell module has been installed.
try {
  Import-Module ActiveDirectory
  Get-ADDomain | out-null
} catch{
  write-host "The required Windows Powershell module 'ActiveDirectory' is not installed on this machine." `
    -ForegroundColor Magenta
  write-host "Use the following link and/or commands to install it and then execute this script again." `
    -ForegroundColor Magenta
  write-host
  write-host "https://4sysops.com/archives/how-to-install-the-powershell-active-directory-module"
  write-host
  write-host "Import-Module ActiveDirectory"
  write-host
  $message = "Alternatively, you can open a remote Powershell session to your server, which has" + `
    " 'ActiveDirectory' module installed. Refer to instructions in the file readme.txt in the same directory for details."
  write-host $message -ForegroundColor Magenta
  write-host
  return
}

# Step 1. Parse value of $userName to extract username and domain into separate parts
$accountName = $null
$domain = $null
$match = [regex]::Match($userName, "([^\\]+)\\(.+)")
if( $match.Success ) {
  $domain = $match.Groups[1].Value
  $accountName = $match.Groups[2].Value
} else {
  $match = [regex]::Match($userName, "([^@]+)@(.+)")
  if( $match.Success ) {
    $accountName = $match.Groups[1].Value
    $domain = $match.Groups[2].Value
  } else {
    $accountName = $userName
  }
}

# Step 2. Extract first level groups where the user is a direct member of.
$user = $null
$explicitGroups = $null
if( $domain ) {
  $user = Get-ADUser -Identity $accountName -Server $domain

  if( !$? ) {
    # Error, user not found.
    return
  }
  $explicitGroups = Get-ADPrincipalGroupMembership -Identity $accountName -Server $domain
  if( !$? ) {
    # Error, explicit groups not found.
    return
  }
} else {
  $user = Get-ADUser -Identity $accountName
  if( !$? ) {
    # Error, user not found.
    return
  }
  $explicitGroups = Get-ADPrincipalGroupMembership -Identity $accountName
  if( !$? ) {
    # Error, explicit groups not found.
    return
  }
}

# Step 3. Recursively extract groups of deeper levels where the first level groups are either direct or nested members of.
# Example 1. Put user1 is a direct member of group1. group1 is a direct member of group 2, group2 is a direct member of group3.
# So the full chain reads as user1 > group1 > group2 > group3. --> The logic should return group1, group2, group3 for user1.
# Example 2. Put user1 is a direct member of group1. group1 is a direct member of group 2. group2 also includes group3 as a member. 
# group3 does not contain user1
# So the full chain reads as user1 > group1 > group2. group 3 > group 2 --> The logic should return only group1 and group2 for user1.
$allGroups = @()
$explicitGroups | % {
  $allGroups = Get-ADGroupRecursiveParentChain -distinguishedName $_.distinguishedName -allGroups $allGroups
  if( !$? ) {
    # Error, nested groups not found.
    return
  }
}

# Step 4. Show the current user
write-host
$message = "UserID: " + $user.SamAccountName + " | Distinguished name: " + $user.distinguishedName
write-host $message

# Step 5. Enlist all groups where the user is either a direct member of or an indirect member resolved via nested group memberships.
# Example of simple-to-read view
if( $useExtendedOutput ) {
  $allGroups | sort -Property name `
    | ft -wrap `
    @{n="Group short name";e={$_.name}},
    @{n="Group distinguished name";e={$_.distinguishedName + [System.Environment]::NewLine}},
    @{n="Owner";e={(Get-ADObject -Identity $_ -Property nTSecurityDescriptor `
      | select -ExpandProperty nTSecurityDescriptor).Owner}},
    @{n="Manager";e={if($_.ManagedBy){(Get-ADObject -Identity $_.ManagedBy).name}}}

  # Example of more generic view
  #$allGroups | sort -Property name `
  #  | ft -wrap `
  #    Name,
  #    #DistinguishedName,
  #    @{n="Owner";e={if($_){(Get-ADObject -Identity $_ -Property nTSecurityDescriptor | select -ExpandProperty nTSecurityDescriptor).Owner}}},
  #    ManagedBy

  write-host "In total: $($allGroups.Count) groups"
  write-host
  
} else {
  $allGroups | sort -Property name `
    | ft -auto -wrap `
    @{n="Group short name";e={$_.name}},
    @{n="Owner";e={(Get-ADObject -Identity $_ -Property nTSecurityDescriptor `
      | select -ExpandProperty nTSecurityDescriptor).Owner}},
    @{n="Manager";e={if($_.ManagedBy){(Get-ADObject -Identity $_.ManagedBy).name}}}

  # Example of more generic view
  #$allGroups | sort -Property name `
  #  | ft -auto -wrap `
  #    Name,
  #    @{n="Owner";e={if($_){(Get-ADObject -Identity $_ -Property nTSecurityDescriptor | select -ExpandProperty nTSecurityDescriptor).Owner}}},
  #    ManagedBy

  write-host "Use an extra parameter -useExtendedOutput `$true to see the extended information"
  write-host
}

How to run this script on various Windows versions.

1. Copy the script given above and save it to some file, for example, c:\tmp\EnlistUserGroupMembershipsRecursively.ps1. The script has been tested in Powershell 2.0 and higher. In order to run the script successfully, you need to install and enable the standard Active Directory module for Windows Powershell that allows you to work with Active Directory objects using Powershell cmdlets.

- Detailed instructions how to do it can be found here: https://4sysops.com/archives/how-to-install-the-powershell-active-directory-module - There are chapters that describe module's installation on particular operating systems like Windows 7 / 8, Windows 2008 / 2012 servers. - After you have installed Active Directory Powershell module, remember to execute the following command: Import-Module ActiveDirectory

2. If you may not install anything on your local machine, you can use the alternative option to connect remotely to a server, which already has Active Directory module Powershell installed and also has connection to your Active Directory Domain Controller. - First of all, you need to enable Powershell remoting by executing the following command on your server and confirming operations. It should create correct Windows Firewall openings to grant access for remote WinRM operations. Enable-PSRemoting - More details can be found here: https://blogs.technet.microsoft.com/heyscriptingguy/2012/12/30/understanding-powershell-remote-management/ - Next, you need to enter your remote Powershell session on the server from your local machine. Execute the following commands. Enter-PSSession -ComputerName –credential domain\administrator Import-Module activedirectory Set-Location c:\ - More details can be found here: https://blogs.technet.microsoft.com/heyscriptingguy/2011/10/04/use-powershell-active-directory-cmdlets-without-installing-any-software/

3. After completion of step 1 above (or alternative step 2), execute the script EnlistUserGroupsRecursively.ps1 with optional parameter -userName, for example:

EnlistUserGroupsRecursively.ps1 # This call uses domain name of the current user. OR EnlistUserGroupsRecursively.ps1 -userName ID # This works for the current domain and uses the default DC. OR EnlistUserGroupsRecursively.ps1 -userName domain\ID OR EnlistUserGroupsRecursively.ps1 -userName ID@domain.com

4. Active directory groups do not have a preset special entity like "Owner". There is only an Owner of a securable AD object (AD group). In addition, each AD group may also have a Manager set via "Managed By" tab of Group Properties. In practice, sometimes namely this Manager is considered as an Owner. - An example of where to set a Group Manager: Open Start > Administrative Tools > Active Directory Users and Computers > Your Domain > Users > Double click on a desired group > Properties > Managed By

A sample output of this script is shown in the screenshot below.